
# Page Templates
The first thing you need to do is create a page. You can create the most amazing content in history, but if it doesn't have a page to be displayed on, then no one will ever know.
There are three main steps for creating a new page:
Create the template for the new page.
Register the new page template in
app.jsAdd the page through the ApostropheCMS user interface.
To create new pages and page templates, you'll use the apostrophe-pages and apostrophe-templates modules. You'll also learn the basics of editing page templates in Nunjucks (opens new window), and a little bit about modules in Apostrophe.
# Creating Page Templates
First you want to create you template. A page template in Apostrophe is stored in an .html file, and is composed of HTML and JavaScript with additional features added through the Nunjucks templating language. The primary location for page templates is lib/modules/apostrophe-pages/views/.
If you have an existing Apostrophe project, take a look at the apostrophe-pages module directory of the project (lib/modules/apostrophe-pages). Here you'll find a /views directory containing our .html template files. Within the /pages subdirectory by default, you'll just find the Home page template, home.html.
In addition to the home.html template in lib/modules/apostrophe-pages, projects created with our CLI from the apostrophe-boilerplate project ship with a simple layout.html file in the top-level views/ folder. Templates that are not from a specific module are found in views/. If you peek inside layout.html, you'll find several examples of "blocks":
{# views/layout.html #}
{% block beforeMain %}
  {#
    We recommend you use the beforeMain block for global page components
    like headers or navigation.
  #}
{% endblock %}

{% block main %}
  {#
    Usually, your page templates in the apostrophe-pages module will override
    this block. It is safe to assume this is where your page-specific content
    should go.
  #}
{% endblock %}

{% block afterMain %}
  {#
    This would be a great place to put a global footer.
  #}
{% endblock %}
Blocks are a great Nunjucks feature; they are defined in files, and when you extend that file, you can override them in your page template by using the blockkeyword. So using these blocks on your pages means everything output by your page template will be inserted into the layout in the appropriate spot.
Two blocks to take note of are title and main. You can extend the title blockto set the page title, although the default layout.html makes a good guess based on the current piece or page. The main block is where the content of your page will go.
As a rule, you should extend the layout.html or create your own templates using a similar pattern in views/ to extend, rather than creating all of your templates.
# Example: Creating a New Page Template
To create a page template:
Create new HTML file in
lib/modules/apostrophe-pages/views/pages/nameddefault.html.At the top of the file, extend
layout.html{% extends "layout.html" %}Within the file create the different blocks that you will need.
{% block main %}
...
{% endblock %}
In this example, we only created a main block, since often you'll want to use content inherited from the main template in
beforeMainandafterMain. The main block would be filled with various widgets used to display and create content. But let's not get ahead of ourselves.
Now that you have a default.html file, you need to register it in app.js to make it available.
NOTE
Even layout.html extends another file. For a typical page load, it extends outerLayout.html, which lives in the lib/modules/apostrophe-templates/views folder. That file extends the outerLayoutBase.html file that ships with Apostrophe. Most of the time you won't need to look there, but it does contain additional blocks you can override, notably extraHead which is perfect for adding link elements to the head element and so on.
# Configuring Apostrophe with app.js
app.js is Apostrophe's main configuration file. This is the file that fires up Apostrophe with a given configuration, and is where you can specify what modules you want to be present in your project. As you add them, you also configure them by providing options via an object.
Some modules are always a part of Apostrophe whether you configure them or not, and you can create your own modules to meet the needs of your project. To learn more about modules, visit the Modules section.
In order for any new page template to load, you must add it to app.js. When you add a new page template to app.js, remember, you're not creating a new page: you're registering a page template that can be used to create new pages.
# Example: Adding a Page Template to app.js
Open
app.jsin your favorite text editor.Add the registration for your new page template to
app.js:
  // app.js
  // This configures our default page template
  'apostrophe-pages': {
    types: [
      //This is the new section
      {
        name: 'default',
        label: 'Default'
      },
      //The rest is what what was there already
      {
        name: 'home',
        label: 'Home'
      },
    ]
  },
Remember, all you're doing here is registering a template. New pages are created in context on your Apostrophe instance.
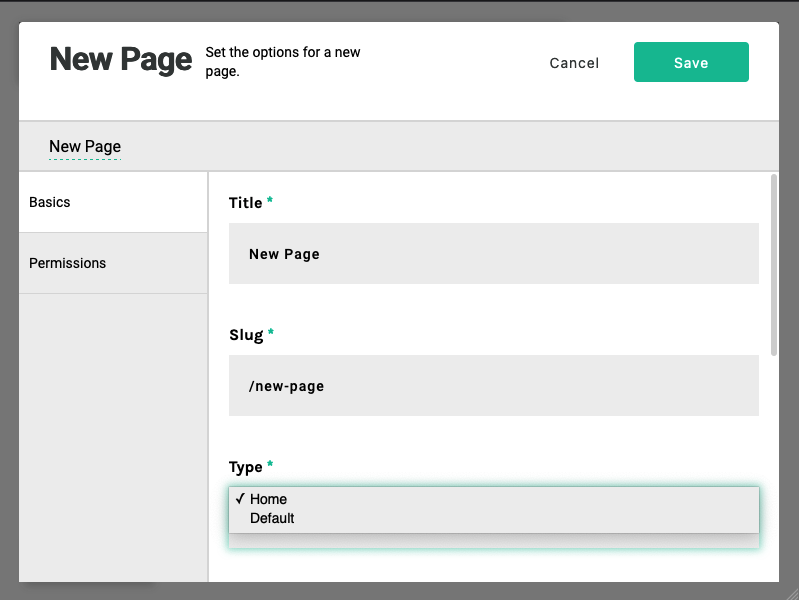
# Example: Create a Page from the New Template
Now that you created the template, use it to create a new page.
Log on to Apostrophe.
Open the main menu and select Pages.
Click New Page.
Enter a Title, a friendly URL, and select your new template under Type.
Nice work! You created a new page template, and now you can create as many pages as you like from that template. Next we'll talk about using Widgets, Singletons, and Areas to add content to your page.